Tuesday, 29 March 2011

Bowling with Reactor

Playing with reactor using multiple objects, we created a bowling scene. Similarly with the previous post, the floor had a mass of 0. The pins were given a mass of 10 and the bowling ball was assigned a mass of 20. To actually get the bowling ball to have some forward momentum, I moved the ball's position in scene 5 and edited the start frame in the reactor modifier to start at frame 3.
I found this tutorial very interesting, how just by manipulating certain attributes you are able to drastically change your bowling score! After playing with the different attributes, missing all the pins, having the ball fly off at such an angle I had no idea where it went, I then added a rotation to the ball and some finger holes.

I created the finger holes with Proboolean.

Using Reactor

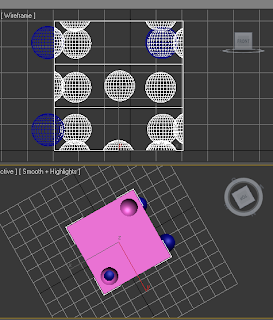
During this tutorial we were using reactor to manipulate the gravity, mass, friction and elasticity of objects to create a sense of realism within the scene. This is my first successful attempt at using reactor, as you can see the red box has been given a mass higher than 0 and the pink box (acting as the scene floor) has a mass set at 0, due to it not moving within this scene. I played with the red box's default settings regarding the friction and more so, the elasticity so that the box would bounce on impact with the floor.

As I mentioned above, I have tried to use reactor before. When creating my martini glass model I did try to follow a tutorial that included setting up a concave object so that the ice would fall and land inside the martini glass realistically although when I tried this my version of 3D Studio Max decided to throw a wobbly and crashed each time I tried. I now, (through following this tutorial) feel more capable of using reactor and how it could potentially benefit my animation, with particular reference to the dice that I intend to roll realistically towards the camera is the opening scene.

Tuesday, 22 March 2011

Emotions in 3D


Within this tutorial we learnt how to create a head that was capable of displaying emotion within the face. We started with a rather gormless looking head which we converted to an editable poly. Next I cloned this head a few times for which to create different expressions on. I chose a wink, open mouth, raised eyebrow and a closed mouth which looked like a smile. In the modifier list, I was then able to select the original head (which I had left in it's original state) and added a 'Morpher' to it. This then gave me the opportunity to link all of the heads into the original model and by varying the percentage on each expression I could change the face of my model. Having done this, I then added a Turbo smooth to the original model and added some animation using autokey and assigning key frames along the time line in positions that I felt added to the animation.


After adding a Turbo Smooth

I particularly enjoyed this tutorial, probably as it was based on human expression and emotion, which I enjoy sketching in my spare time anyway. It is incredible how varied you can create a look on one face through a series of seemingly simple steps. I hope to use similar techniques in my finished animation. My rendered animation for this tutorial however did end up looking rather seedy!


Tutorial Animation

Tuesday, 8 March 2011

Kettle Roller Coaster(ish)


Here I have been experimenting with an object (kettle) following a line to create a path for the camera to follow. I have used a target camera so that we can view the kettle following it's path from a static point. Next I tried to experiment with a free camera to follow the kettle around the path in a rollercoaster-esque scenario.

Adding Stretch and Squash

To add a little more realism to some bouncing balls I have edited the spheres using the scale tool at the bounce point, whilst using set key, keying in each change of scale with the key button. Before adding the 'squash' I moved the pivot point so that the balls looked to squash at point of impact rather than at the centre of the ball. I ensured that my 'stretch and squash' curve (found in curve editor) matched the duration of the bounce of the ball. I found this was important as before I did this, my balls were stretching and squshing much more often than when they were bouncing.. which was not the intended result! This was a first attempt and so again, is a little primitive, although it does look more realistic than my previous video.


Animating Objects


During this tutorial, we learnt the very basics of creating an animation in 3D Studio. Above you can see some bouncing balls, created by manipulating the timeline through Set Key, adjusting the curve editor to add a sense of realism to how the balls fall (adding a sense of gravity) and also by editing the dope sheet and ranges to make the balls bounce separately from one another different start points) and at different speeds/durations.

I found this tutorial very interesting and impressed at the effect that can acheived after adding only a slight amount of animation. I know the animation above is very primitive, however it has shown me that any object can 'come alive' with just a simple application of movement.

I look forward to generating animations on my 3 models can't wait to have a play around and see what effects I can acheive.

Thursday, 3 March 2011

Neon Sign


For my third object I picked a neon sign, to show a different style of modelling and to use different techniques and to give me a bit of a challenge with regard to the materials that would be used.

Initially I created an arrow using the line tools and a lofting technique, which I also used for the wiring. I then used a text tool to create the ‘coming soon’ bulbs. Following this, I generated 42 hooks to ‘hold’ the bulbs onto the backing and positioned them around the bulbs. I initially created a case for the sign to be held in although towards the end of creating this model I felt that this was unnecessary. I created a backing for the bulbs to be held against the wall with and inserted some wires and an electrical box. I then applied various materials to each object, to create the neon glow and manipulated various settings to get the desired result I was looking for. To give the sign something to be hung onto I just created a plane to which I added a bitmap of a wall. I was quite pleased with how this model came out as I particularly wanted to use neon lights due to them being a significant trend in Las Vegas, the setting of my chosen film. Also in the closing sequence of my storyboard there is a scene in which some neon lighting would light up ‘Bond’ then flicker as realistic neon signs do, to briefly say ‘James’ for a split second, to return to ‘Bond’ as a nod to the famous Bond quote.

Although I have faced many obstacles so far in my experience with 3D Studio Max, I feel that I am slowly beginning to understand at least some of the techniques that can be used within the software, and the set backs that I have had have only helped to increase my interest within 3D Modeling. I just hope that I can pick up the animation side of things a little quicker!


Hand


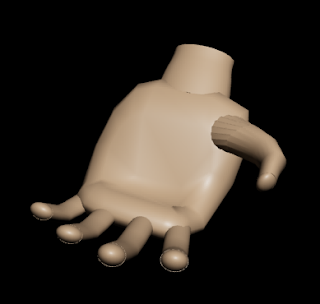
After my previous rather shameful attempts at organic 3D modelling, I decided that to contrast the very geometric tone of my dice and martini glass models, I would create the hand that throws the dice towards the camera in one of the scenes for my second model. It turns out that I still require quite a bit of practice with organic models, even with the use of tutorials I found this quite a challenge. 
I began by following a tutorial using extrusion techniques to modify a cylinder into a hand shape. The palm of the hand I found that I managed quite well, (to my great surprise!) however I then hit a stumbling block when I had to extrude the fingers. My hand looked more like a glove that had been lost than a hand.. I tried to modify it to look more realistic but in the end I had altered it too much from which to return and so I started again from my last safe point and tried using a technique that I felt more capable with.. using cylinders to modify into fingers. I was not happy with the way that this looked, as the techniques were so different for each part, so I attempted to create a hand using shapes modified within 3D Studio and then grouped together. I am still not entirely satisfied with the final outcome and will continue to work on it and my organic modelling skills in general which I am not pleased with. 


Dice


For my first model, I have decided to create some realistic casino dice to accompany my martini glass (shaken, not stirred!) That will be a main part of my final animation. This was my first attempt at using Boolean technique and I used ProBoolean to cut out each of the spots on the dice by using spheres. I then tried to recreate a realistic looking material for the red translucent dice. Especially since they will form a significant role in the final trailer. This proved to be quite time consuming, as I wanted to try and recreate the look by changing the settings rather than relying on a predefined setting. I then selected each of the ‘spots’ of the dice and applied an opaque white material. To give a sense of setting I added a craps table bitmap to a plane for them to rest upon which I hope to model into an actual craps table, which will be in one scene of my piece.


Martini Glass


For this model I found a tutorial on creating a tumbler of water with ice in. I drew half of the martini glass in Adobe Illustrator and imported it into 3D Studio, using the lathe tool to create the actual glass. I then created the water by using a cone shape and added some ice cubes made from boxes and chamfing them. Next I assigned physical properties to the objects on the scene using reactor and a solid body modifier. I gave the ice cubes a weight of 5 and positioned them directly above the glass, so that on previewing the animation they would fall realistically into the glass. This proved more difficult than I anticipated as the animation preview caused 3D Studio to crash on every attempt I made at getting this to work. In the end I placed the ice into the glass myself and hopefully in the coming weeks I will learn what went wrong and how to rectify my mistake! To the glass, ice and ‘martini’ I added different materials to try to recreate a realistic looking scene. I added some omnilights and a Target spotlight to set the scene.


Silhouette - Failed attempt!


This is my attempt at creating a female body to use as a silhouette figure in my trailer. I must admit I found this very taxing and the chest in particular. I realised after many hours of attempting this model that perhaps trying this first was not one of my better plans and that I needed more practice within 3D Studio Max learning both the interface and what I can and can’t create. So, unfortunately, so as not to waste further time I decided to leave my figure for now and hopefully I will be able to complete her to use in my animation in the very near future.
The tools that I tried here were modifying standard primitives, using a bitmap on a plane as a reference image, extrusions, using soft selection, rings, loops, connections, and the cut function.


Storyboard and Research Board


Right, here’s an update of all the work that I’ve been doing over the past few weeks.


STORYBOARDS


This is one of my storyboards for my final animation. I am torn between two bond films with similar themes, Diamonds are Forever and Casino Royale. I say they have similar themes as both involve casinos. Diamonds are forever was filmed primarily in Las Vegas and the Mojave desert while Casino Royale (2006 version) was set in Montenegro for the poker scenes but has a lot of casino references.. the title being a bit of a give away here. As I am so torn I have toyed with the idea of combining the two films for my animation if I could to give more of a trailer for James Bond films in general, rather than one particular film. As I am still undecided I have created two separate storyboards for the time being. Below is my storyboard for Casino Royale. 


As you can see from each of my storyboards I have decided to go for a more ambiguous design rather than attempting to recreate scenes from the films. I have two reasons for this choice which are that, personally when I watch film trailers that have a great deal of action in them, it makes me feel that I know what will happen. I much prefer trailers that intrigue the audience and almost create anticipation for what kind of film it is. Secondly I must admit I’m not a great James Bond fan, usually only watching the films when they appear at Christmas and such, however my favourite part of James Bond films are definitely the opening sequences. With this in mind I felt that I could tease the audience with some themes of the film whilst retaining an air on the opening sequences in the trailer.

Each of the storyboards are rough ideas at the moment and I am leaning towards the Diamonds are Forever one, for which I will generate a more detailed version to help me plan out my final piece shortly.


Here is my research board on everything 'James Bond'.


Tuesday, 1 March 2011

Mood Board - Casino Royale


This is my mood board for another of the films I have been researching for this project - Casino Royale.

I have mainly been looking at the 2006 remake of Casino Royale in which Daniel Craig portrays our hero, "Bond, James Bond".

Bond achieves his double "0" ranking by killing his second of two hits required for this status at the start of the film. It is in this film that we see Bond win his 1964 Aston Martin at a game of cards, which he uses to his advantage as a chip to win a night with another man's wife, Solange. Bond's nemesis in this portrayal is one 'Le Chiffre'. Bond foils a plot of Le Chiffre's to destroy the prototype of a large airline called Starfleet, which Le Chiffre thinks would make millions. To avoid being killed by his investors, Le Chiffre must earn back the money he has lost and sets up a high stakes poker game in Montenegro for 10 players with entry fees of $10 million each.
The main love interest in Casino Royale in Vesper Lynd, the government agent sent to keep an eye on Bond during the poker tournament. Through a series of dramatic scenes including Bond losing all the money, almost dying from a spiked drink and being captured and tortured, our hero, as ever is triumphant and wins the tournament, the money, gets the girl and invents his signature martini (“shaken not stirred”) in the process.

Many of the images used in this mood board were sourced online, a list of these links can be found below. Additionally to the sourced images, I took some of the photos personally and edited them within Photoshop.


Links to images used within mood board;

http://www.wizardsmagicchest.com/magic-shop/index.php?main_page=product_info&products_id=707
http://www.google.co.uk/imgres?imgurl=http://www.007museum.com/Aston_Martin_DB5_007JB_1964.jpg&imgrefurl=http://www.007museum.com/Aston_Martin_DB5.htm&usg=__objAjgbFW-DcnuHaJQ1cgn7osHs=&h=968&w=2025&sz=436&hl=en&start=0&zoom=1&tbnid=Er1DKAtkR5QcZM:&tbnh=107&tbnw=224&ei=Hi9tTb2pJMKo8QPuvaWUBQ&prev=/images%3Fq%3DDB5%2B007%26hl%3Den%26client%3Dsafari%26rls%3Den%26biw%3D1280%26bih%3D639%26tbs%3Disch:1&itbs=1&iact=hc&vpx=500&vpy=112&dur=1399&hovh=155&hovw=325&tx=177&ty=100&oei=ES9tTZjGDoWCsQPxmuTGBQ&page=1&ndsp=15&ved=1t:429,r:2,s:0
http://roulettescience.com/
http://en.wikipedia.org/wiki/File:Set_of_Poker_Chips_in_Case.jpg
http://www.bestinternetshopping.com/embroidered_patch/gambling.htm